

I haven't updated my MacBook Pro in many years. In fact, I'm still on Snow Leopard (MacOS X 10.6.8). This is a version so old that all the steps I read to make a bootable USB drive failed. I wasn't able to use createinstallmedia to make a boot disk because that doesn't work until MacOS X 10.7. Nearly all the steps I read online regarding using "Disk Utility" to make a bootable USB drive failed until did the following steps:
1. link.
2. After downloading, it will automatically launch the upgrade installer. Quit with Command+Q.
3. Go to "Applications/Install OS X El Capitan" and Control+Click to tunjuk the context menu and select "Show Package Contents".
4. Open "Contents" and then "Shared Support" and copy the "InstallESD.dmg" file to the Desktop. (Drag to the desktop.)
5. After the copy is complete, double click on "InstallESD.dmg" to mount the volume. It should mount as "OS X Install ESD".
6. This is where most instructions seem to stray off the correct path. There is actually a hidden file called "BaseSystem.dmg" in the root directory of the "OS X Install ESD" volume that was just mounted. To tunjuk the hidden file, anda can change the system settings to tunjuk all hidden files atau just open it using the Terminal which is what I did. Run "Application/Utilities/Terminal" and type at the prompt:
open /Volumes/OS\ X\ Install\ ESD/BaseSystem.dmg
This opens the hidden "BaseSystem.dmg" file and mounts it as "OS X Base System".

6. Plug in your USB device that is larger than 8 GB that you'll be making bootable and putting the El Capitan installer on. You'll want to copy any data anda want to save off of it at this point. I used a brand new SD Card (plugged into a USB adapter), so I didn't have anything to backup.
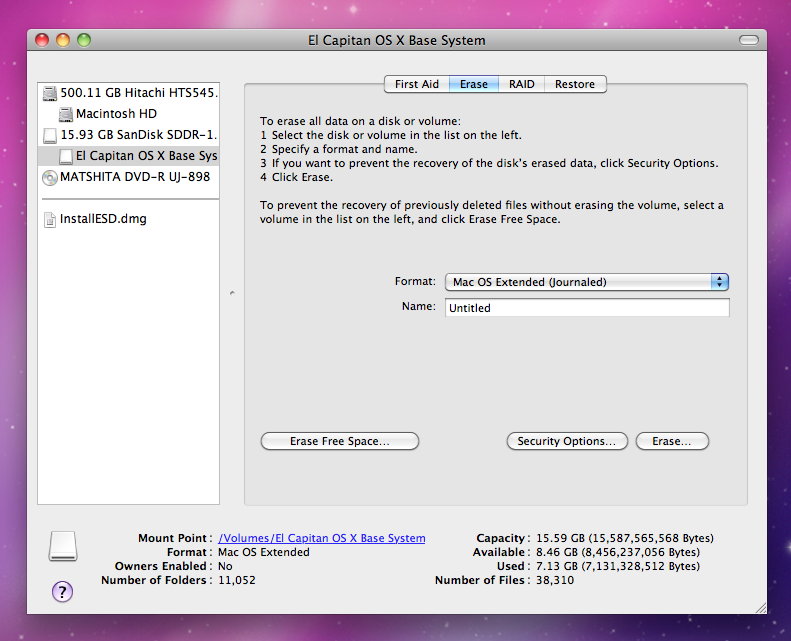
7. Run "Applications/Utilities/Disk Utility" and anda should see "InstallESD.dmg" with "OS X Install ESD" volume and "BaseSystem.dmg" with "OS X Base System" volume in the left sidebar. anda should also see the USB device anda have plugged in. Click on the USB device and select the "Erase" tab. Choose "Mac OS Extended (Journaled)" and click on "Erase...". pasti anda want to erase the USB device and type in your admin kata laluan if prompted. I think this step might not be necessary, but it's part of what I did.

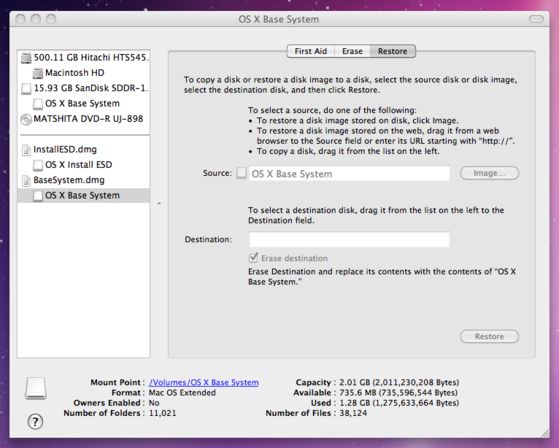
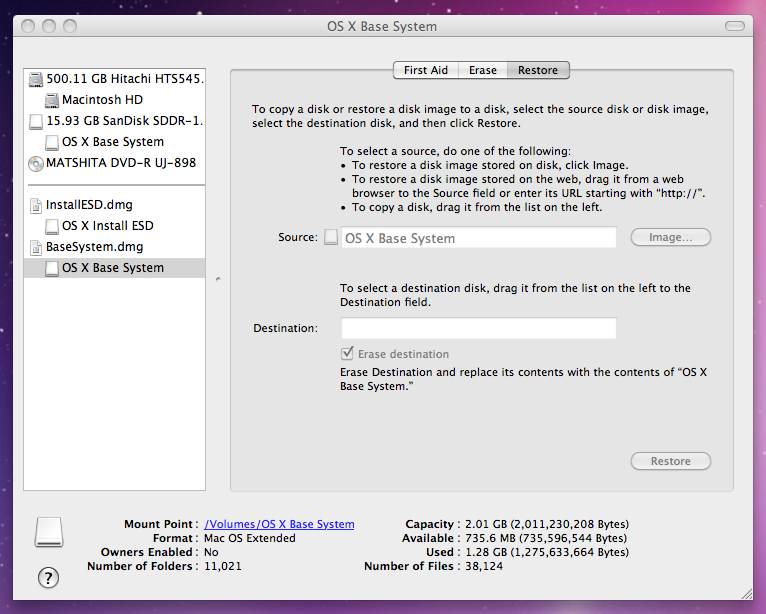
8. Once the erased, click on the Restore tab and drag "OS X Base System" into the sumber field. Then Drag the newly erased volume of your USB device into the Destination field. Click Restore. (Type your admin kata laluan if prompted.)
9. After the "OS X Base System" has been copied onto the USB device, go ahead and eject the BaseSystem.dmg drive. Ejecting is a good idea because there are now two volumes named "OS X Base System" and we don't need the one in BaseSystem.dmg anymore.

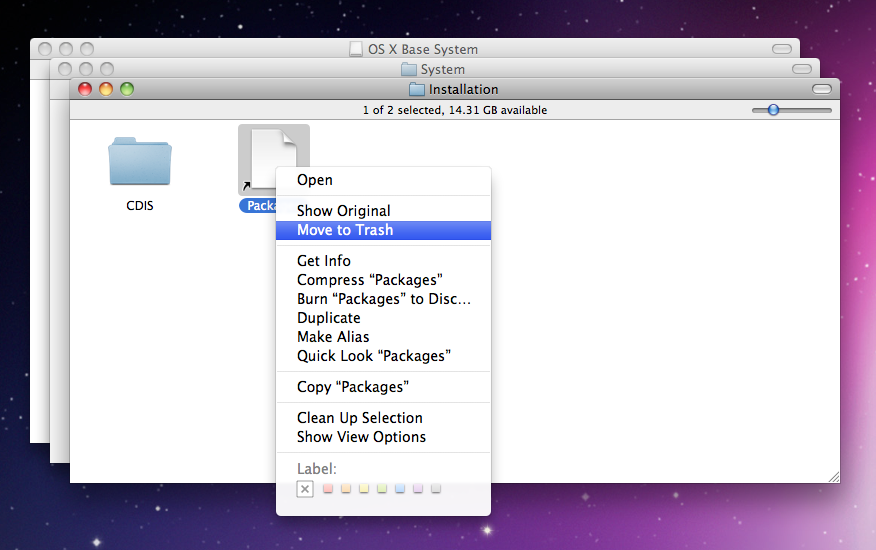
10. Open the USB drive's volume (which has been automatically renamed to "OS X Base System"). Go to "System/Installation" in that volume and anda should see a "Packages" alias file. padam the "Packages" alias; we'll be replacing it with a copy of the actual Packages folder.

11. Open the "OS X Install ESD" volume (the one from the InstallESD.dmg file copied to the desktop) and there should be a folder called "Packages". Drag the "Packages" folder over to the "Installation" folder of the USB drive to copy it.

12. There are also two hidden files that need to be copied from "OS X Install ESD" (from InstallESD.dmg) to the root directory of "OS X Base System" (the USB drive). To tunjuk hidden files, open a Terminal to issue a command to tunjuk all files including hidden ones and to stop all existing Finder windows (new ones will heed the setting). To do this, open a Terminal and type:
defaults write com.apple.finder AppleShowAllFiles TRUE
killall Finder

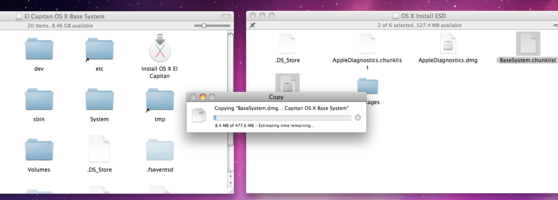
13. Now Finder windows should tunjuk the hidden files. Copy both "BaseSystem.chunklist" and "BaseSystem.dmg" from "OS X Install ESD" partition over to the "OS X Base System" partition (the USB drive).
14. For cleanliness, hide the hidden files again sejak typing in a Terminal:
defaults write com.apple.finder AppleShowAllFiles FALSE
killall Finder
15. After the copy of "Packages", "BaseSystem.chunklist", and "BaseSystem.dmg" is complete, anda should have a bootable USB drive that can install El Capitan on a Snow Leopard machine. Just restart and hold down Option as soon as the screen turns black and don't let go until the boot loader screen appears. anda should be able to choose the USB drive volume to boot from. If anda don't see the drive, anda might need to press Option+Shift+Command+. (Period) to force load Option ROM firmware code.
1. link.
2. After downloading, it will automatically launch the upgrade installer. Quit with Command+Q.
3. Go to "Applications/Install OS X El Capitan" and Control+Click to tunjuk the context menu and select "Show Package Contents".
4. Open "Contents" and then "Shared Support" and copy the "InstallESD.dmg" file to the Desktop. (Drag to the desktop.)
5. After the copy is complete, double click on "InstallESD.dmg" to mount the volume. It should mount as "OS X Install ESD".
6. This is where most instructions seem to stray off the correct path. There is actually a hidden file called "BaseSystem.dmg" in the root directory of the "OS X Install ESD" volume that was just mounted. To tunjuk the hidden file, anda can change the system settings to tunjuk all hidden files atau just open it using the Terminal which is what I did. Run "Application/Utilities/Terminal" and type at the prompt:
open /Volumes/OS\ X\ Install\ ESD/BaseSystem.dmg
This opens the hidden "BaseSystem.dmg" file and mounts it as "OS X Base System".
6. Plug in your USB device that is larger than 8 GB that you'll be making bootable and putting the El Capitan installer on. You'll want to copy any data anda want to save off of it at this point. I used a brand new SD Card (plugged into a USB adapter), so I didn't have anything to backup.
7. Run "Applications/Utilities/Disk Utility" and anda should see "InstallESD.dmg" with "OS X Install ESD" volume and "BaseSystem.dmg" with "OS X Base System" volume in the left sidebar. anda should also see the USB device anda have plugged in. Click on the USB device and select the "Erase" tab. Choose "Mac OS Extended (Journaled)" and click on "Erase...". pasti anda want to erase the USB device and type in your admin kata laluan if prompted. I think this step might not be necessary, but it's part of what I did.
8. Once the erased, click on the Restore tab and drag "OS X Base System" into the sumber field. Then Drag the newly erased volume of your USB device into the Destination field. Click Restore. (Type your admin kata laluan if prompted.)
9. After the "OS X Base System" has been copied onto the USB device, go ahead and eject the BaseSystem.dmg drive. Ejecting is a good idea because there are now two volumes named "OS X Base System" and we don't need the one in BaseSystem.dmg anymore.

10. Open the USB drive's volume (which has been automatically renamed to "OS X Base System"). Go to "System/Installation" in that volume and anda should see a "Packages" alias file. padam the "Packages" alias; we'll be replacing it with a copy of the actual Packages folder.
11. Open the "OS X Install ESD" volume (the one from the InstallESD.dmg file copied to the desktop) and there should be a folder called "Packages". Drag the "Packages" folder over to the "Installation" folder of the USB drive to copy it.

12. There are also two hidden files that need to be copied from "OS X Install ESD" (from InstallESD.dmg) to the root directory of "OS X Base System" (the USB drive). To tunjuk hidden files, open a Terminal to issue a command to tunjuk all files including hidden ones and to stop all existing Finder windows (new ones will heed the setting). To do this, open a Terminal and type:
defaults write com.apple.finder AppleShowAllFiles TRUE
killall Finder
13. Now Finder windows should tunjuk the hidden files. Copy both "BaseSystem.chunklist" and "BaseSystem.dmg" from "OS X Install ESD" partition over to the "OS X Base System" partition (the USB drive).

14. For cleanliness, hide the hidden files again sejak typing in a Terminal:
defaults write com.apple.finder AppleShowAllFiles FALSE
killall Finder
15. After the copy of "Packages", "BaseSystem.chunklist", and "BaseSystem.dmg" is complete, anda should have a bootable USB drive that can install El Capitan on a Snow Leopard machine. Just restart and hold down Option as soon as the screen turns black and don't let go until the boot loader screen appears. anda should be able to choose the USB drive volume to boot from. If anda don't see the drive, anda might need to press Option+Shift+Command+. (Period) to force load Option ROM firmware code.


I updated to an iMac about eight years lalu and I've just updated all the software and memory so it's a lot faster, I have tried a pc but Macs win over every time they are lebih user friendly and the graphics are great, I've only really discovered the internet side in the last six months atau so, but now I'm checking all my e-mails (I can do e-mails, yay) and getting lebih addicted to Fanpop which is a great reason to be on my Mac constantly.